Workflow Quickstart
import dlt
Logging
dlt.util.Logger can be used to create CSV logs.
log = dlt.util.Logger('losses', ['training', 'validation'])
log({'training': 10, 'validation':20})
Checkpointing
dlt.util.Checkpointer can be used to create checkpoints for any
(torch serializable) objects.
data_chkp = Checkpointer('data')
a = np.array([1,2,3])
data_chkp.save(a)
a = None
a = data_chkp.load()
Checkpointers automatically save and load a network’s state dict.
net_chkp = Checkpointer('model')
net = nn.Linear(10, 10)
data_chkp.save(net)
net = None
# net needs to be passed to the checkpointer to set the state dict.
data_chkp.load(net)
Built-in Trainers
The trainers (dlt.train) provide an easy to use interface for quick experimentation.
# Define a trainer
if use_gan:
    trainer = dlt.train.VanillaGANTrainer(generator, discriminator, g_optim, d_optim)
    log = dlt.util.Logger('gan_training', trainer.loss_names_training())
else:
    trainer = dlt.train.VanillaTrainer(generator, nn.MSE(), g_optim)
    log = dlt.util.Logger('normal_training', trainer.loss_names_training())

# Training is just iterating the trainer with a data loader.
# See the trainers documentation for more detail
for batch, (prediction, losses) in trainer(loader):
    log(losses)
Configuration
The package provides a parser, with some built-in command line arguments. These can be used to quickly configure experiments without much boilerplate code. Extra arguments can be added.
# file main.py
# Add some extra command line options to the built-in ones
dlt.config.add_extras([{'flag': '--extra_opt', 'default': 'foo'}])
# Parse
opt = dlt.config.parse(verbose=False)
# Can access built in options as well as the added ones
print('Some Settings: ', opt.experiment_name, opt.batch_size, opt.lr, opt.extra_opt)
Using configuration files makes bookkeeping a lot easier.
# file settings.cfg
# Can use commented lines
--experiment_name config_test
--lr 1e-4
--batch_size 64
# Can also set any extra settings
--extra_opt bar
Invoke the main.py script from above using these settings:
$ python main.py @settings.cfg
Some Settings:  config_test 64 0.0001 bar
The functions in dlt.config use the built-in arguments and can be configured from the command line.
Arguments belong to categories. Each category can be split into subsets.
# file main.py
# Split dataset settings
dlt.config.make_subsets({'dataset': ['set1', 'set2']})
# Training set
set1_data = dlt.config.torchvision_dataset(preprocess=cv2torch, subset='set1')
set1_loader = dlt.config.loader(set1_data)
# Validation set
set2_data = dlt.config.torchvision_dataset(preprocess=cv2torch, subset='set2')
set2_loader = dlt.config.loader(set2_data)
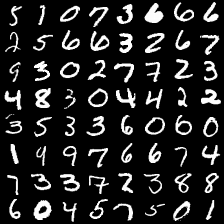
for (img, lbl) in set1_loader:
dlt.viz.imshow(dlt.util.make_grid(img, color=False), pause=2.0)
break
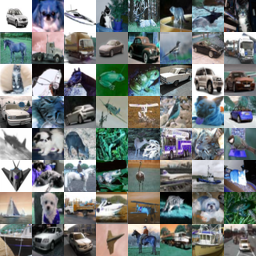
for (img, lbl) in set2_loader:
dlt.viz.imshow(dlt.util.make_grid(img, color=True), pause=2.0)
break
# file settings.cfg
--batch_size 64
# We can set the split arguments like so:
# set1
--named_dataset_set1 mnist
--data_set1 ~/data/mnist
# set2
--named_dataset_set2 cifar10
--data_set2 ~/data/cifar10
$ python main.py @settings.cfg
The following is a configuration file template with the default values:
# general
--experiment_name experiment
--save_path .
--seed None
--max_epochs 100000
# dataset
--data .
--load_all False
--torchvision_dataset None
--extensions ['jpg']
# dataloader
--num_threads 4
--batch_size 1
--shuffle True
--pin_memory True
--drop_last False
# model
--overwrite_weights True
# optimizer
--optimizer adam
--lr 0.001
--momentum 0.9
--dampening 0.0
--beta1 0.9
--beta2 0.99
--rho 0.9
--alpha 0.99
--centered False
--lr_decay 0.0
--optim_eps 1e-08
--weight_decay 0.0
# scheduler
--lr_schedule step
--lr_step_size 100
--lr_patience 10
--lr_cooldown 0
--lr_min 1e-07
--lr_ratio 0.5
# gpu
--use_gpu True
--device 0
--cudnn_benchmark True
# samples
--save_samples False
--sample_freq 1
Command Line Plotting
dlt-plot can be used from the command line to plot CSV files.
Live update using the ‘-r’/’–refresh’ flag (seconds).
dlt-plot -f training.csv -r 5Select columns using their number or name after the file.
dlt-plot -f averages.csv train_loss val_loss
Plot multiple files/columns. This will plot columns 0 and 3 from file_1.csv and column 4 from file_2.csv
dlt-plot -f file_1.csv 0 3 -f file_2.csv 4
Select the first/last points to plot using ‘–head’/’–tail’ (or remove using ‘–rhead’/’–rtail).
dlt-plot -f data.csv --head 100Average/Variance every <N> points using ‘–sub_avg’/’–sub_var’.
dlt-plot -f training.csv --sub_avg 10Moving Average/Variance every <N> points using ‘–mov_avg’/’–mov_var’.
dlt-plot -f training.csv --mov_avg 10If multiple columns/files are used then the settings can be set for each individual column/file respectively. E.g. this will sub_avg training by 1000 and validation by 100:
dlt-plot -f training.csv -f validation.csv --sub_avg 1000 100
NOTE: Transformations are applied in the order they are encountered. E.g. this will plot points 5-10:
dlt-plot -f training.csv --head 10 --tail 5
whereas this will plot points end-10 to end-5:
dlt-plot -f training.csv --tail 10 --head 5
There are more available flags (logarithmic axes, setting titles, labels etc). For more information:
dlt-plot --help
Dispatching
dlt-dispatch can be used from the command line to create a self contained experiment in a directory. Useful for saving snapshots of code that is likely to change.
dlt-dispatch experiment_name -d ~/experiments -m main.py -c settings.cfg
The above code will create a directory ~/experiments/experiment_name containg main.py, settings.cfg (along with a run.sh script).